


Sometimes what I want most to do is just cut and fold some paper into a little book. There’s something about being able to physically hold a book and turn the pages that is just not the same in a digital version. So sometimes it seems important to make a physical version of the story you’re attempting to make.
The book is an ancient technology, but actual paper may still be the most enduring way to save information and pass it on to future Earthlings.
It’s very satisfying to have made a physical little book. And you can show it to people.
And children can get huge satisfaction from making a book too.
So in this blog post, I wanted to share a few quick & easy ways that I use to make little books, and all of these ways of little-book-making are ways that children can make books too, so I also wanted to say a bit about children making books in schools.
Here we go!

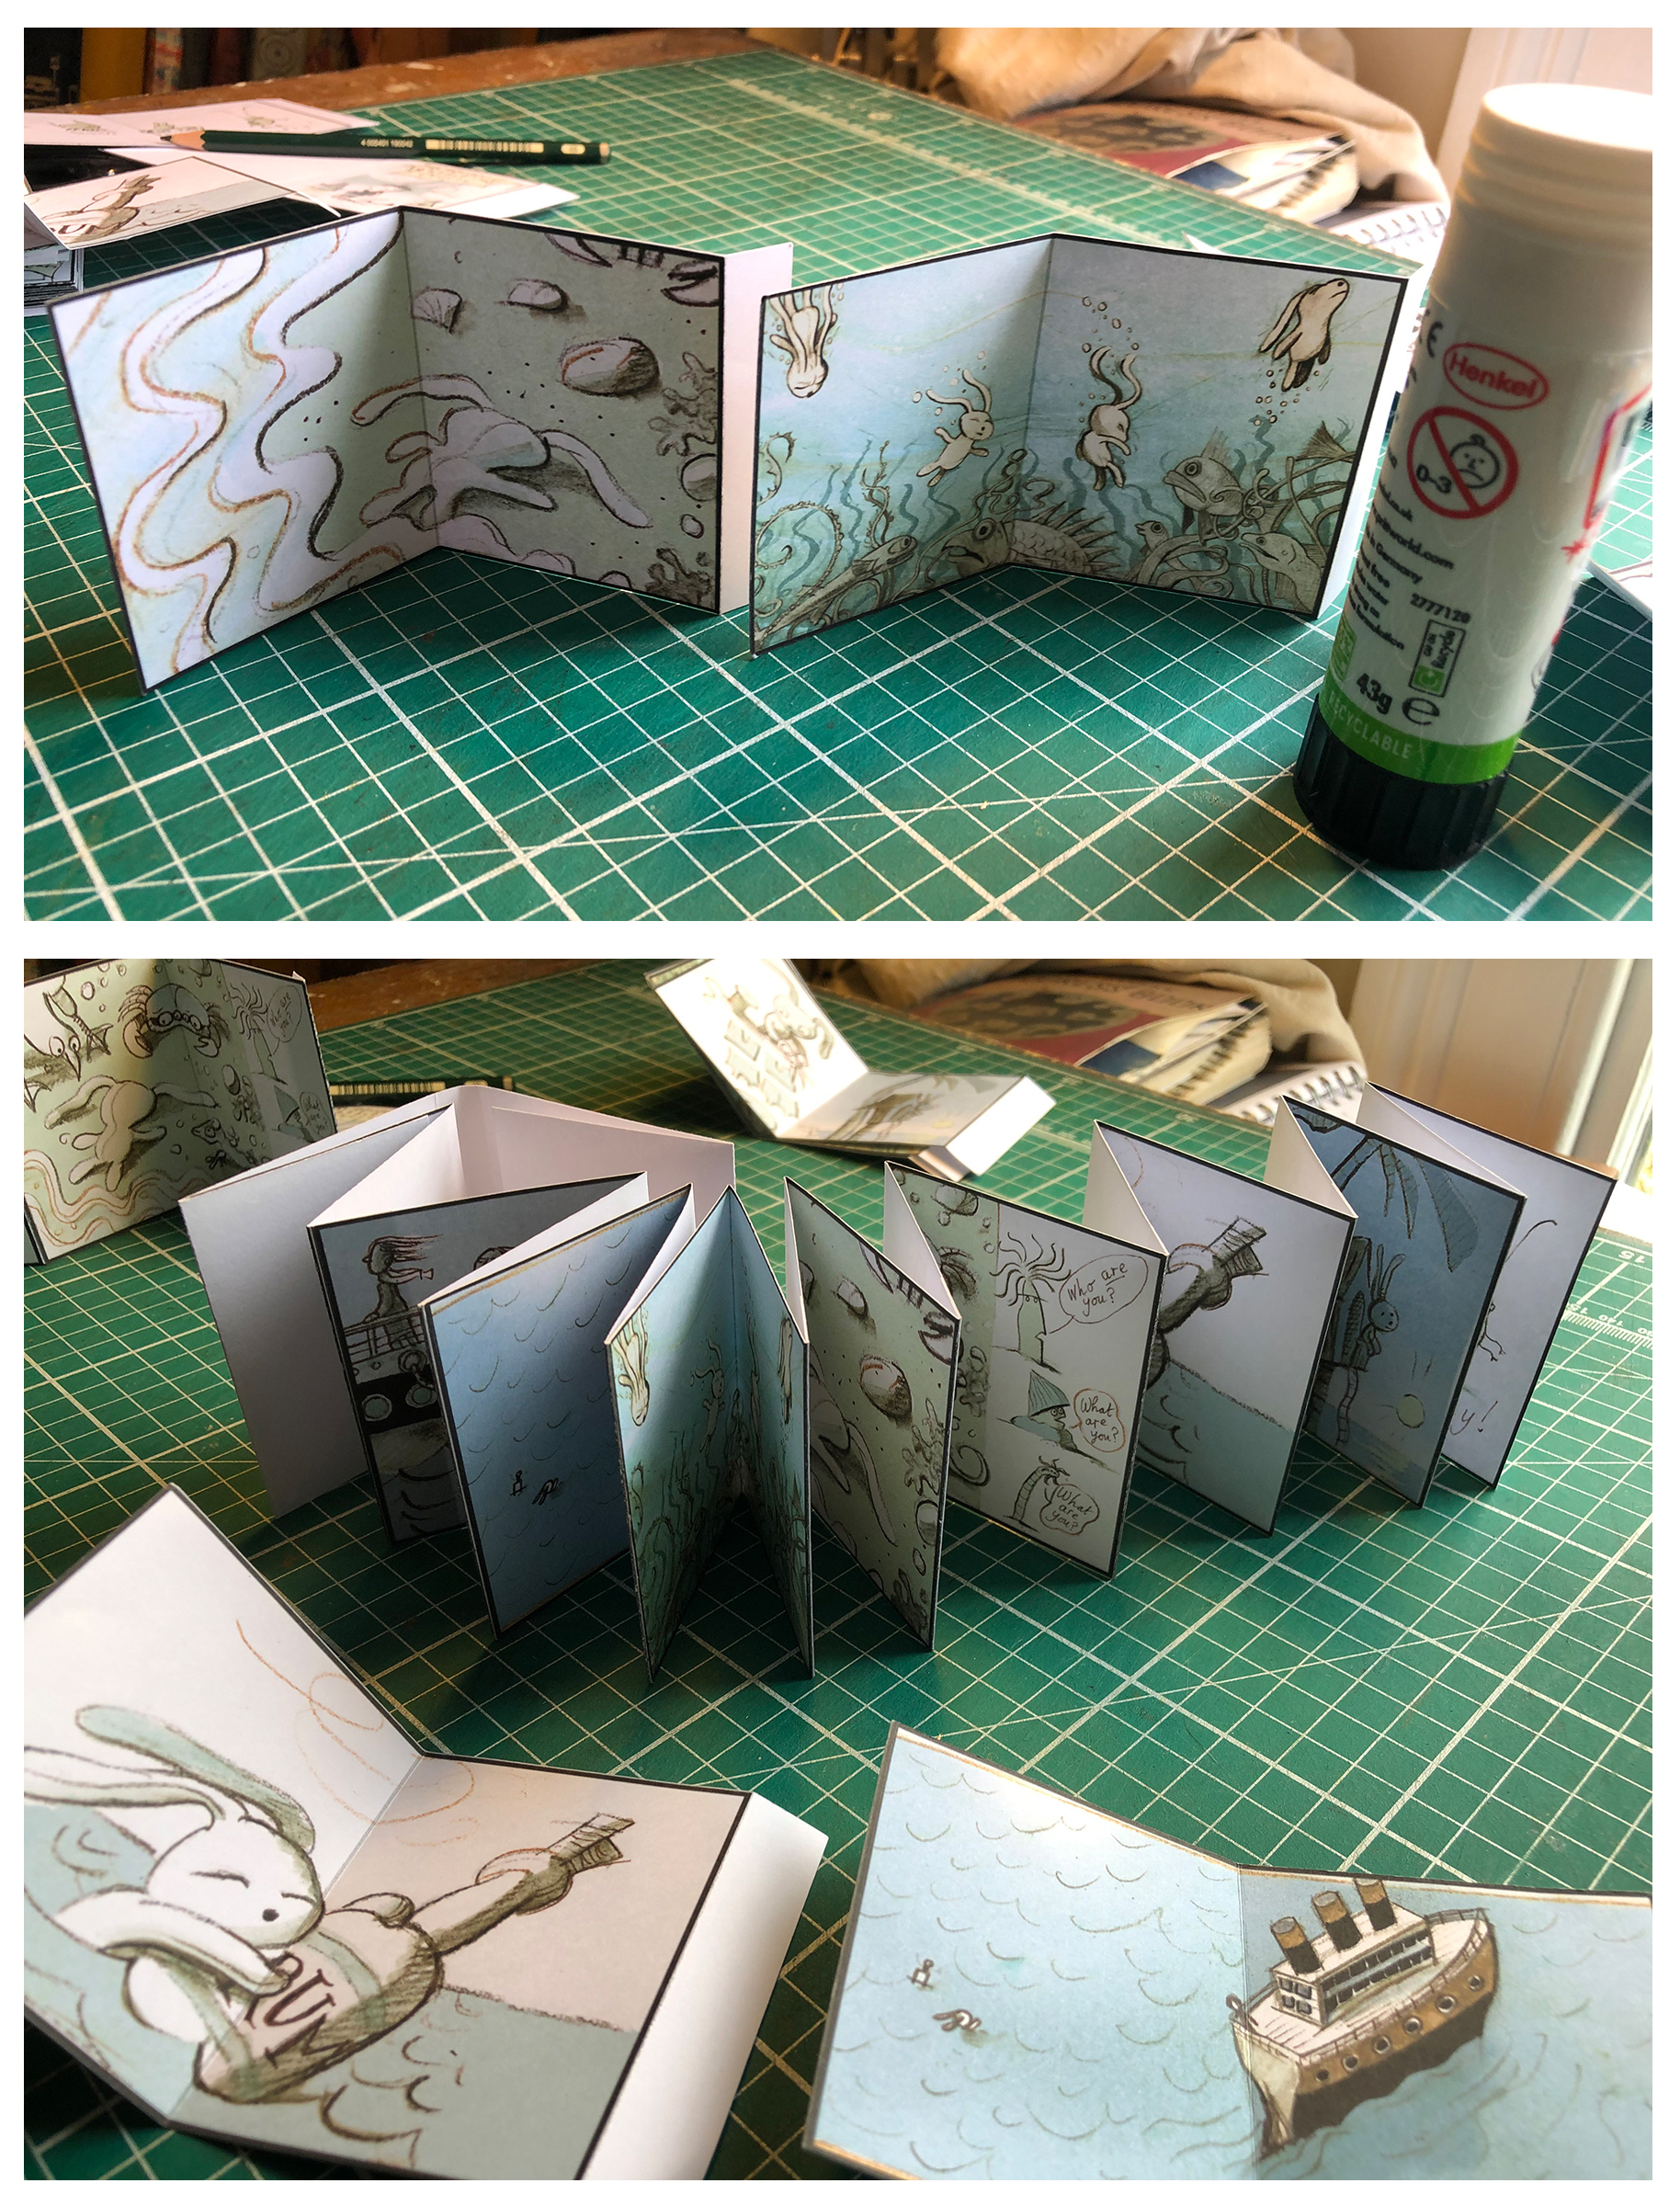
LITTLE BOOK Number 1: Stuck Down Spreads
A picture book page always has a fold in the middle. For this type of little book, you can either:

Make yourself lots of little pages the same size with a fold in the middle and work onto them....

OR print yourself a storyboard to work onto, like this one...
 Here's a storyboard that's been sketched into.


 |
| Making teeny minibooks for the Last Wolf and the Greatest Show helped me look at the stories as a whole. |
What’s good:
µBeing able to work small scale on a storyboard means you can work fast. µAssembling your pages means you can reorder them, can swap in and out pages that need improving, and play with your content. µYou can have any number of pages. µYou end up with a nice sturdy book. µPages don’t have to stay rectangular: here’s the dummy for the Bad Bunnies where I’ve cut into the pages to make them more magical.

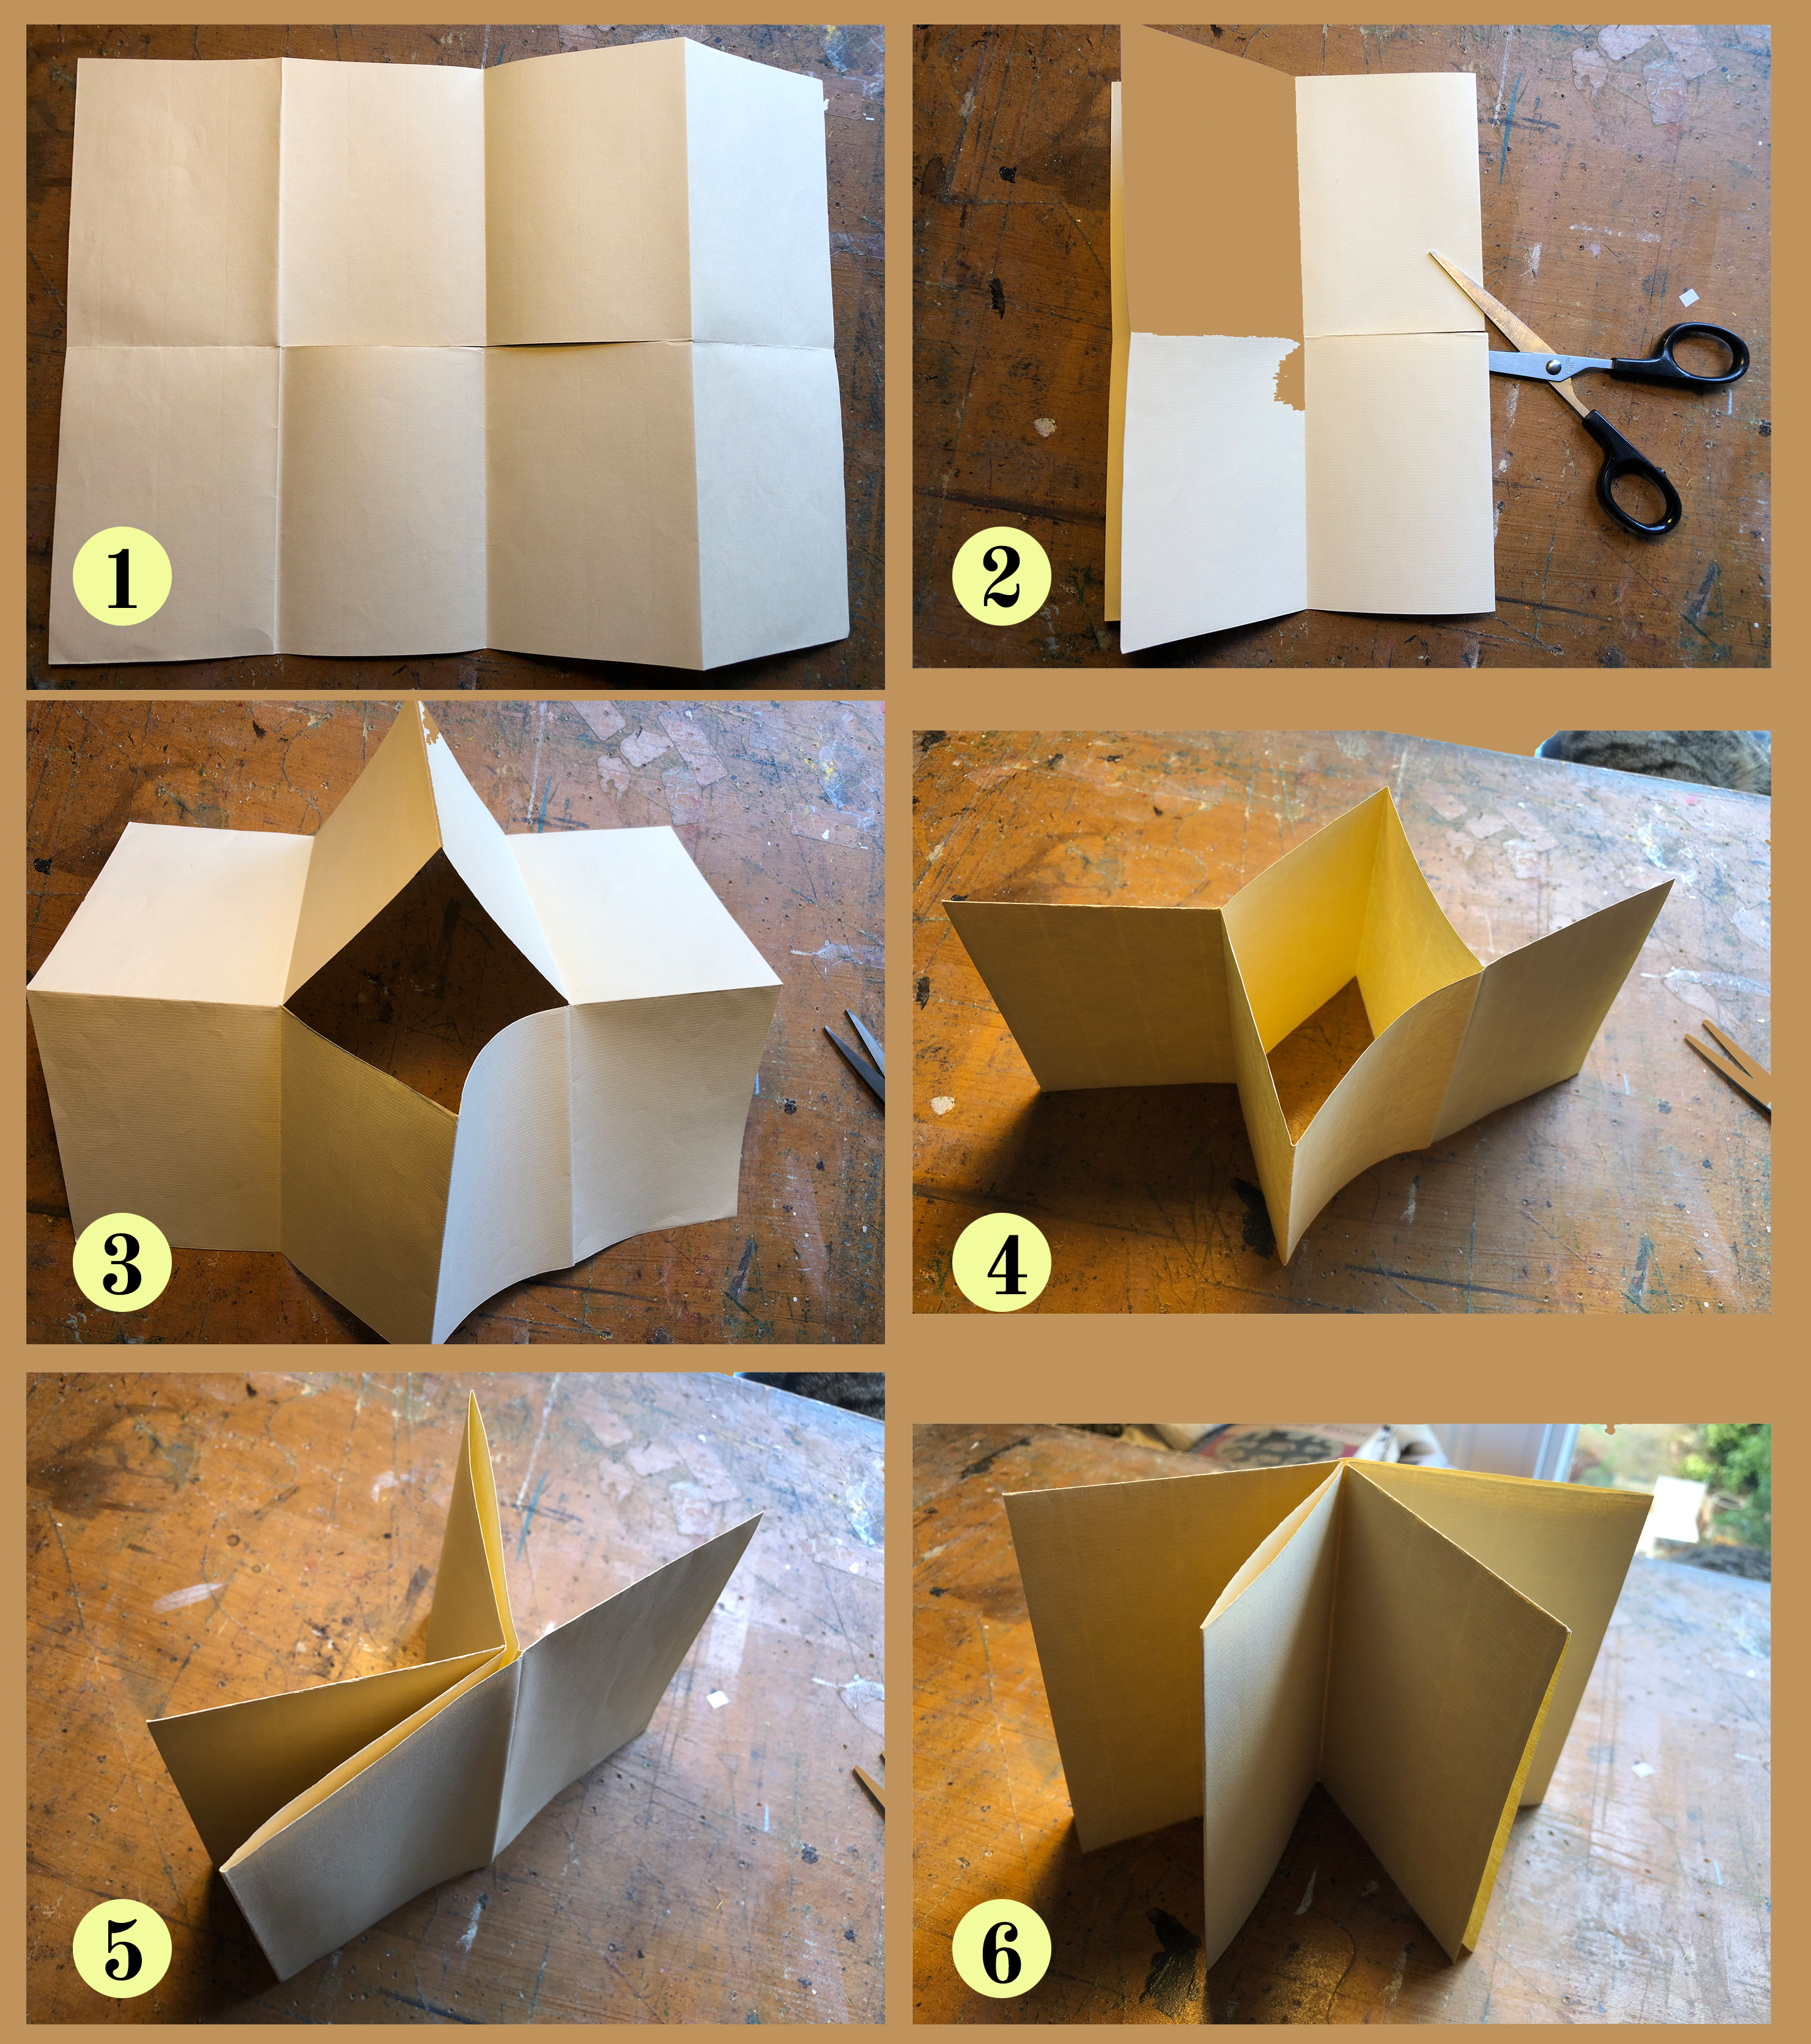
LITTLE BOOK No 2 : Zig-zag book

This is how I do
it: The zig-zag book spread has an extra tab on the side, where it’s going to
be stuck together, so you either need to fold yourself some pages with tabs, or
use a storyboard format with tabs to print out your pages. Fold the centre fold
and the tab fold for each spread. (The blank storyboard we saw earlier has gaps between spreads, so you can leave the right hand gap attached to make spreads with tabs)

Then start gluing – Pritt stick seems to be strong enough for this.
What’s good:
µAgain, you can play with the order and look at your content before assembling. µWhen your book is glued together you can flip through it like a normal book but also pull out your zigzag and see your story all at once – and that can be a nice way to display your book. µ Again, you can make your book as long or as short as you like.
 |
| Little Red Riding Hood by Caroline Whitehead. This zig zag is one folded piece of card with a slipcase cover. |
Those two ways are the way I always make little book dummies, because they give you the flexibility to change your spread ideas easily. But there are other formats that can be fun to play with, or good for publishing little batches of handmade books – here are a couple:
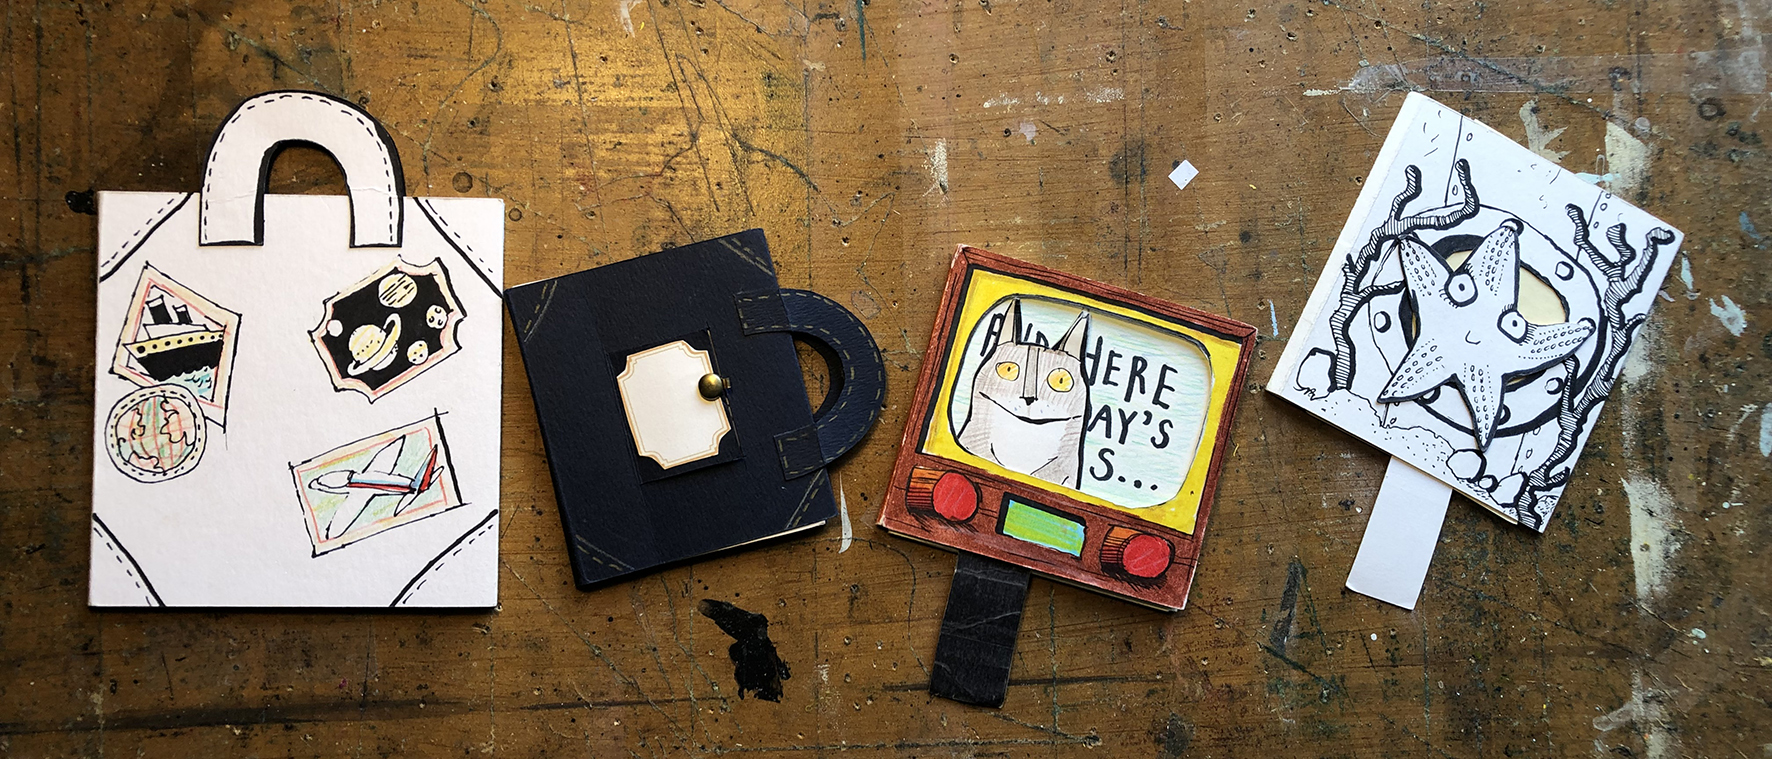
The Folded origami book

This is a nice way to make a little book out of one folded piece of paper. What’s a nice possibility is, because the artwork is on only one side, it makes it easy to photocopy/scan the finished book and print and cut/fold a batch of books.
What to do: 1. Fold your paper into 8 equal rectangles by folding in half 3 times. Open it out and fold all your folds the other way, so the folds are happy to be folded both ways. 2. With the paper landscape ay round, fold in half. Cut from the centre fold to half way. 3&4. Open out and fold in half lengthways, your cut bit should open out into a box shape. 5&6 Flateen the box shape by pushing the two outside pages together and press down your book. You should have 3 inside spreads and a front and back cover.

The Pamphlet Book
You can use this
format to make a blank book – but I don’t really like starting with a blank
empty book and filling it up – I like starting with collecting my delicious
ingredients and exciting content, and then building a book with it.
But the pamphlet book format is how books really get published, so if you like super-complicated page ordering, printing a pamphlet book could be for you!


NOW – fold. First fold into 8 equal rectangles, just like for the origami book.
1. Now have the side with page 1 in front of you, with the 1 at the bottom right.
2. Fold in half so you can still see page 1.
3. Fold in half again, fold the top half down so you just see pages 1 and 16.
4. Fold in half again so you can only see page 1.

NOW sew it together. Make an odd number of holes in the main fold that will be the spine.


THE COVER
Now if you want to get super-crafty, there’s making a book-binding cover, with fabric and boards inside, but that’s more of an upholstery project and I tend to need something way quicker, so here’s how I make covers…
Cover 01: Super Simple Folded Cover
Use card, adjust your template to fit your book.

Then either: slip around the front and back pages of your inside book, or Stick your covers flaps down to firm it up, and stick page 01 and your last page into your cover.

Cover 02: Slightly Stronger Cover
I often make covers like this, but it’s a fiddlier template.

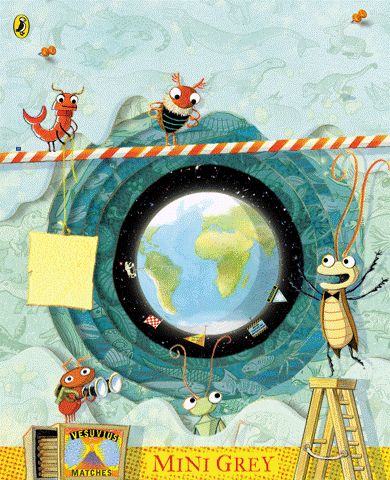
But that’s not all – you can have
Fun With Covers
Playing with your
cover can mean your book can turn into a suitcase or a
shop or a television…what about a house? A theatre? Books are the masters of disguise.


It's fun to just play with the different things you can do with a simple card cover.
Making Books with Children

Making a book – even a small short one – is a lot of work, and a long process. So it’s good to think small – for example making a short book for one poem could be a more do-able project than creating a complete picture book. The standard 32 page picture book format is way too much work! Work on a much smaller scale of number of pages.
I think it’s good to try working from a storyboard: you can use your storyboard sketches to make the actual pages. If you work at a small scale it is easy to change a page, to swap in an alternative, and you have less invested. It’s good to see your spreads all at once in front of you. Sometimes just ordering your images is the way to create your story. If you work at a small scale you can realise your ideas FAST, and I find drawing small is liberating. Do tests! Collage in drawings you’ve made or pictures you’ve found: cutting & sticking and drawing are all activities where you start to generate more ideas, and the doing of them is productive but not daunting.
I particularly love cutting & sticking words – sometimes just sticking your words on your double page spread can help you invent how to tell that bit of your story.
And then there’s always the possibility – for a stall at the winter/summer fair: could your class become a publishing house?
 |
| These are two books made with my son Herbie when he was at primary school. Herbie made the contents and I helped him publish them - and he sold quite a few at the school winter sale. |
Lastly:
Children making stories in school often is seen as a literacy/writing activity – and that the main outcome will be writing-based. For me, the practice of making stories involves visual story telling: diagrams, sketches, visual brainstorms. But story-making drawings don’t have to be ‘good’ drawings – they’re just a way to collect ideas. (See my post on How To Not Draw Things for more about this...) I find being able to move my elements around and being able to start anywhere sets me free, which is why collecting images and words, and cutting and moving them about is so useful. I don’t have to start at the beginning and move linearly.
The homemade book is often the only existing copy in an edition of one, a special object to be kept forever. And if you’ve managed to transform paper into the magic doorway that is a book, you’ve made something precious indeed.
Mini’s latest book is The Greatest Show on Earth, published by Puffin.
No comments:
Post a Comment